Common Panels
In This Topic...
While some configuration and option panels are exclusive to certain sections, some are shared and can be accessed from multiple locations.
Notes Panel
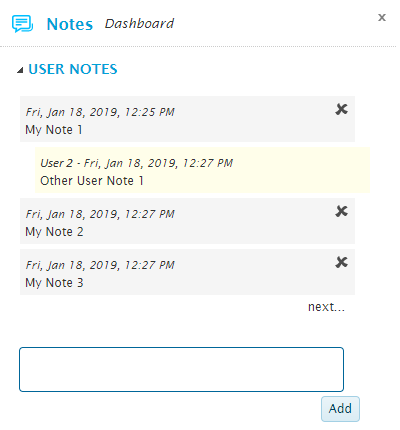
Notes can be attached to individual dataviews, snapshots, or to entire dashboards. These notes can provide additional information, or provide a forum for questions and answers.
All notes are visible to users who have access to the specific dashboard or dataview, and have the rights to view notes in general.
The Title of the associated dashboard or dataview is displayed at the top of the panel.
The notes are displayed in order of date and time. Any notes from other users are indented and highlighted, and display the name of the user.
Click  to delete a note. You can only delete your own notes.
Click Next to scroll up and down through the notes history.
Snapshots Panel
The snapshots feature allows the current data displayed in a dataview to be saved, storing the data in a format that can still be manipulated by the user. The snapshot only takes the data currently visible, so filters and criteria can be applied to reduce the data, and the snapshot will only include that set of data. Snapshots can be viewed, with full control over sorting and filtering, and can be combined with other snapshots with the same data structure.
The Snapshots panel opens to the right of the screen when selecting Snaps from the Dashboard group or selecting Snapshot from the dataview control panel. Some options are only available when opening the panel from one option or another. Click X to close the panel again.
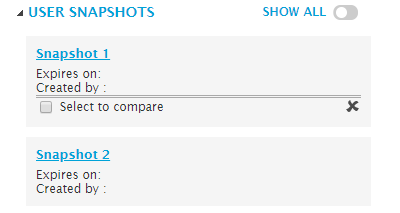
The User Snapshots group lists the available snapshots. When opened form the Dashboard group, this list includes all available snapshots across all available dashboards. When opened from a dataview, this list will only show snapshots for the current dataview.
Click on a snapshot name to view the saved data. A window opens with the data, and includes most of the standard controls for a dataview, such as filtering, sorting, changing the view type, and adding notes. To close the snapshot view, click the X in the top-right corner or click outside the window.
Hovering over a snapshot in the list displays additional options for comparing snapshots or click the X to delete the snapshot.
To compare two snapshots, hover over each snapshot and check the Select to compare box. On checking the second box, the snapshot view window opens with the combined data. See the Snapshot Comparison section for details. Note that the comparison shows the newer snapshot in comparison to the older snapshot, and is not effected by the order that the boxes are checked.
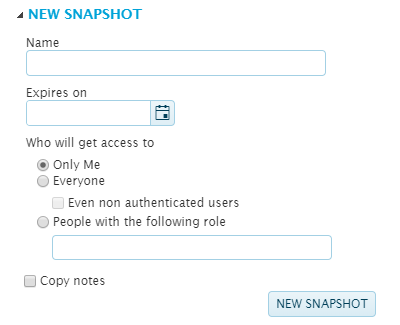
The New Snapshot group is available when opening the Snapshots panel from a dataview. This group is used to save a snapshot of the data currently displayed in the dataview.
Click New Snapshot to save the snapshot.
The Snapshot Schedule group is available when opening the Snapshots panel from a dataview. This group is used to schedule recurring snapshots that will be automatically generated by the system.
| Active | Once the configuration has been completed and saved, the configuration can be enabled or disabled as needed. If the configuration is disabled, snapshots will not be generated. If the configuration is re-enabled after a period, any missed snapshots will be skipped and the schedule will resume for future snapshots. |
| Changing the configuration to active or inactive is saved immediately without having to save the changes to the configuration. | |
| Name | Enter the name for the schedule configuration. Note that this name is only used for administration. The snapshots themselves will display the name of the dataview and the date the snapshot was generated. |
| Frequency | Select how often the snapshot should be generated. |
| The snapshot should be generated on a daily schedule. | |
| Selecting this option displays additional fields where you can select if the snapshot should be generated every day or every set number of days. The maximum number of days is 999. | |
| The snapshot should be generated on a weekly schedule. | |
| Selecting this option displays additional fields where you can choose to generate the snapshot every set number of weeks, and on what days of the week. The maximum number of weeks is 99. | |
| The snapshot should be generated on a monthly schedule. | |
| Selecting this option displays additional fields where you can choose to generate the snapshot on a specific day of every set number of months, or define a more specific schedule using settings like the first day of the month or the third Monday of the month. The maximum number of months is 12. | |
| Time | Select a time of day to generate the snapshot, or enter the time manually for more specific times. |
| Start Date | Select the date to start the defined schedule. The first snapshot will be generated on the first scheduled date to occur on or after this date. |
| End Date | Select the date to end the defined schedule. If no date is provided, the schedule will run indefinitely until deactivated. |
| Snapshot expires in | Enter the number of days to keep each snapshot. The snapshot will be automatically deleted after the defined number of days have elapsed. The maximum number of days is 999. |
| Access to | Select who will be able to view the generated snapshots. |
| Only you will be able to see the snapshots. | |
| The snapshots will be visible to all users. | |
| Only accessible to users with a specific security role assigned to their user account. Select this option and enter the Code of the required security role. | |
| Multiple roles can be provided, formatted as comma-separated and without spaces. If a user has at least one of these roles, they will be able to see the snapshots. | |
| How to send notifications | The system can notify you when a scheduled snapshot is generated. |
| This option is not available at this time. | |
| Allows notifications to appear in a browser window. The window allows all standard controls for the snapshot. | |
| On selecting this option, the Receive notification on current browser option must be enabled within the browser that should receive the notifications. This registers the notifications with the current browser, and only the current browser. Note that the chosen browser must have push notifications enabled. See the browser instructions for details. | |
| Note that this registration will push notifications for all scheduled snapshots available to the current user. | |
| Allows notifications to appear on a mobile device. The mobile device must be registered with SmartView, and Receive Push Notifications must be enabled in the SmartView Mobile app. For more information, see SmartView Mobile. | |
| Message | Enter the message to be included in the notification. |
| Take into consideration the type of notification being sent. A long message may not be appropriate for Mobile Notifications. | |
| Conditions to apply | This option lists all Conditional Formatting rules configured for the current dataview instance. Select which rules should be used to control if the notification should be sent. |
| Rules can be enabled or disabled individually, or use the Select/Unselect ALL checkbox to enable or disable all rules at once. All selected conditions must be met by at least one record in the dataview instance for the notification to be sent. |
When creating a new schedule, click Save to save the schedule.
If the schedule configuration is active, the Update button is available to save any changes.
If the schedule configuration is inactive, the Delete Generated Snapshots link will delete all snapshots that have been generated so far for the current configuration.
If the schedule configuration is inactive, the Delete Schedule link will delete the entire schedule configuration, resetting the fields back to the default settings, as well as deleting all snapshots for the configuration.
Snapshot Comparison
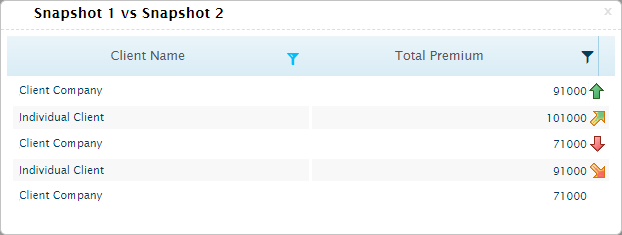
On checking the Select to compare box for two snapshots, the snapshot comparison window opens.
The values in the two snapshots are compared according to the settings for the dataview instance. The compared values are marked with arrows to indicate the comparative improvement or decline in value.
| Up |
Indicates a moderate improvement. |
| Big Up |
Indicates a large improvement. |
| Small Down |
Indicates a moderate decline. |
| Down |
Indicates a large decline. |
If no icon is shown, this indicates that the change is less than the Up and Small Down thresholds.
Note that increases in value are not automatically considered improvements, and decreases in value are not automatically considered declines. Whether an increase or decrease is considered an improvement or decline is configured in the dataview instance for each column.
Export Options Panel
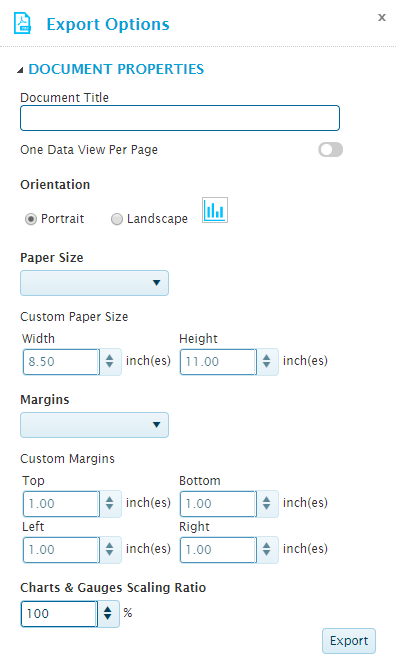
The Export Options panel opens to the right of the screen when selecting Export from the Dashboard group. Click X to close the panel again.
The options are displayed by category. Each category can be expanded or collapsed using the  and
and  icons.
The Document Properties category includes the following options.
Click Export to generate the file. A standard file download window opens to save or view the file.
